

I don't give handmade gifts often but when I do, they are inevitably baby gifts. Sewing baby gifts is quick, easy, fun, and satisfying as everything is cuter in miniature. One of my go to baby gift patterns recently has been the Harem Coverall by Brindille and Twig. It has no closures and goes on and off through the neck. I love this pattern, but sometimes you just want some snaps, especially on the small sizes, to make those frequent diaper changes easier. I am a pattern hacker at heart and don't feel the need to buy a thousand patterns if I can get what I want with a simple tweak. Adding a snap front placket is one of those simple tweaks. I've gone through this step by step which might make it look more complicated than it is, but seriously, sooooo easy. You could do this hack to any pattern that has a solid front. So lets get started.
[(And PS since you all know I sew may more than I blog, I decided the only way this (requested) tutorial post would make it to the blog was it if I did it super low key - Tiahna style. So enjoy all my iPhone photos, no backdrops and and my dirty ironing board cover - you're welcome:)]

1. Using the harem coverall or another pattern of your choice, cut out all your pieces as instructed except the front. For the front, instead of cutting one on the fold, cut two mirror images and extend the center front by 2 inches. Notch the center front of your original pattern on the neckline and crotch so you know there the center front is supposed to be.

2. Cut two strips of fusible interfacing 2 inches wide to run the length of the center front. You could use stretch interfacing for this since the fabric for these type of patterns is a knit, but I chose a light weight woven interfacing because I don't want the fabric of the placket to stretch as that would allow the snaps to rip out. Fuse your interfacing.

3. Fold the raw edge back 1 inch, wrong sides together. Press. Repeat to other side.

4. Fold back again, so the fold of your placket meets your center front notch.

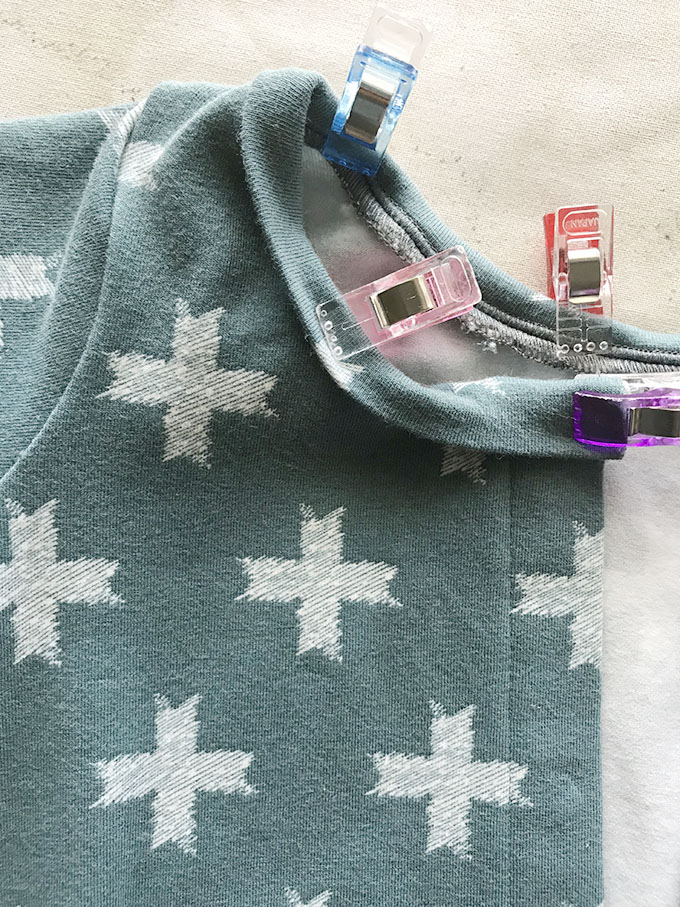
5. Take your two front pieces to your sewing machine and topstitch down your placket with a 7/8 seam allowance. I use the walking foot on my machine to do this to keep the fabric from shifting.

6. Assemble your shoulders, sleeves and side seams per pattern instructions.


7. Before sewing up the crotch seam, baste the bottom of your front plackets together. Then sew the crotch seam, and any cuffs or hem as instructed in the pattern.


8. Because the neckband will now have an opening in the center front, we need to finish the short edges. Sew or serge the short edges, flip right side out, and then attach the neckband like normal. We'll be folding it down again to form a binding, but if you want you could just do a true neck binding. The instructions for that are great in the free Durango Tank pattern by Hey June. I have made several more of these little outfits with a true neck blinding since making this one. I just tried it this way so you wouldn't need a new neckband piece.
If your wondering if you can just so a regular neckband, I don't think so. I tried that and the snap ripped out, even when the neckband was interfaced there. Its not strong enough to withstand the pulling of the opening of the snap. If you want to so use a regular neckband piece, you can, but you shouldn't put a snap in it.

9. Fold your neckband down so the fold of the neckband is facing down, covering your neckband seam. Edge stitch in place.


10. Then its time to apply the snaps. The best snaps for baby clothes are ring snaps. I got this set off of amazon for only 10 bucks but the most recommended from others are snaps and the snap setter tool from Snap Source. I'm really happy with this set though as it comes with pliers to set the snaps instead of having to hammer them. They work perfectly every time for me. This set comes with 10 rings each in 10 different colors and then a whole bunch of plain silver ones.
Following the instructions with your snaps, install them along your placket. I decided to do 5 and spaced them accordingly. For reference, this is a 0-3 month size outfit.


And you're done! Let me know what other patterns your use this hack on! And share photos with me on instagram, I'm @ammonlane.

This is such a great resource that you are providing and you give it away for free. I love seeing blog that understand the value of providing a quality resource for free. Kinderkledij
ReplyDeleteGreat survey, I'm sure you're getting a great response. Baby Floor Mats
ReplyDeleteThis is such a great resource that you are providing and you give it away for free. I love seeing blog that understand the value of providing a quality resource for free. Baby products
ReplyDeleteThe slide should also be very safe to use. It should be child friendly, meaning the materials used for this slide should be proper. Smooth enough for them to do a slide and also it should be strong enough to handle the weight. l shaped triple bunk bed
ReplyDeletemattress reviews from the experts in the industry can be an eye opening experience, The further you read, the more you will be convinced that the best mattresses are not only limited to the most popular or expensive brands, once in a while you'll come across some comfortable truck mattress
ReplyDelete