Wednesday, January 20

Handmade Weekender Bag


I got into bag making a few years ago and now, whenever I need a break from sewing clothes or just want a change, I make a bag. There are so many great patterns, styles, and kinds out there that I always find something really quickly and I use this as an opportunity to use prints I like but wouldn't wear. It's a great way to use loud, bold prints, or try a different fabric type like waxed canvas or leather. This one is all canvas but I made a faux leather purse in March and waxed canvas tote in April. I love all the different fabrics, materials and hardware used in bags. Its so different than garment making but just as satisfying!

For this project I decided on a weekender bag because my daughter and I are taking a little girls trip soon so why not make a bag for it?! Thats the thought process of a sewist, right? I hemmed and hawed for a quite a while one which pattern to use, but after a thorough google search to find all of my weekender options, I finally decided on the Sew for Home Roomy Canvas Weekender Duffle. Its a free pattern with a full blog post tutorial and supply lists. I tend to like bags with structure and lots of hardware. I think those things make it look super professional and high quality. It does mean you have quite a bit of materials to find so you need to plan a project like this in advance so you can source everything you need. 

Finding fabric is easy enough. This pattern calls for canvas, so I headed over to fabric dot com because they have tons of options. I wanted something fun but not too crazy so I went with this leopard print. You can use the same fabric for the base like they did with their sample, but I decided to do a contrast and used  different variations of black Essex cotton linen canvas for the bottom and lining. I usually grab zippers from wawak but I didn't need anything else from there so I just headed to Joann for a 24 inch zipper. My ulrta firm stabilizer (which I used instead of plastic canvas) is from there as well. The pattern doesn't call for cording to be sewn into the handles, but I sewed some in anyway to make them more substantial. You can use drawstring cording or whatever else you can find. I bought this stuff, seen below, but it was too big and I ended up using a smaller drawstring I had on hand instead. 
Then you get to hardware, which when I started sewing bags seemed daunting to me. So many different little pieces in varying quantities are needed but have no fear, they're not hard to find! I like to get hardware from Bag Maker Supply on Etsy. There are other places too, but I go here first because they tend to have everything. It can take a minute to find it in the right quantity, size and finish, but they are a great resource. Joann usually has all the basic hardware as well, but I've struggled in the past to find it in the right sizes, or found they'd have half of what I need but not the rest. So this place is great because they tend to have it all. And they are super affordable, ship really fast and refund any shipping overages. 

The webbing I hand on hand - it originally came from Wawak but Joann has it too. If you can find the cotton kind, its a lot better. But I had this poly kind on hand so its what I used. 


For hardware like snaps, I recommend just getting a little kit like this. It's hard to find snaps where you can buy just a few at a time in the right finish and size, so I got this kit (and another in a smaller size) on amazon last year. It comes with 20 sets in each finish and all the tools and instructions to install them. Don't be intimated - they're very simple, straightforward and fast to install. A few hits with a hammer and you're done!

For materials, all that's left is interfacing (I like Pellon SF 101) and fusible fleece (from Joann or Wawak). It sounds like a lot but really, a little online shopping one evening is all you need and maybe to pop into your local fabric store and you'll have it all. 


The bag has hardware that converts the shape of it from a standard duffle where you would carry using the hand straps, and a cross over style bag using the long, adjustable shoulder strap. It's nice to be able to use it both ways, and s the edges down keeps everything so tight and secure.
It has two interior slip pockets, a large zipper pocket, as well as an exterior pocket that snaps closed so you can keep smaller items tucked away, too. I like that I can use it for a weekend trip, an airplane carry on, or really anything. It's not so big as to be annoying and its not small enough to make it useless. It really is just the right size. I took it on a little trip to visit my sister and it was perfect. 


So if you're looking for a bag project, or something to get you familiar with using hardware, or just want a different kind of project for a change, I highly recommend bags, and this pattern in particular. I promise sourcing materials isn't so bad. Just plan an online shopping evening and once everything arrives you'll be good to go!

Do you like sewing bags? Is it something you're interested in trying? 
Its so fun!


Monday, February 3

Kelly Anorak Gortex Ski Coat


You never know what this sewing hobby/skill might do for you, people. Never did I imagine that I would make myself a proper ski coat. Ever! So let me tell you how it came to be. Back in October we were gathering all our ski clothes to get ready for the upcoming season. I tried on my coat and instantly started complaining about the awful fit. (Now that most of my wardrobe is handmade I have no tolerance for ill fitting clothes, apparently). I continued complaining that my ski clothes couldn't be made by me and actually fit. #pearprobs. And my husband said, 'Why not? Why couldn't you make a ski coat? You make everything else?' I went off about not being able to make it waterproof and not being able to source proper materials, etc. And the conversation sort of ended there. 

But then I couldn't stop thinking about it. And looking up information online and doing some research. And I realized a regular 'ole person like me could buy Gortex! And I could buy seam tape! And I'm a pro patten hacker so I knew I could alter a pattern to get the fit and look I wanted. So....here we are. And here's how I did it.

(FYI - Its a beefy post! Below are supplies used and their sources, sizing adjustments made, design features I included,  directions and info on applying seam tape, a mini tutorial on creating zippered welt pockets and creating flaps for pockets, and a cost analysis break down - in that order. Feel free to scroll to the parts you're interested in!)

Supplies
1. Pattern: I used the Kelly Anorak. I've made it before in waxed canvas, I wrote about that here, and I knew it would work for this. 
2. Waterproof fabric: I used this three layer Gortex I got on eBay. If you look on eBay here there is a variety off Gortex to chose from. Seattle Fabrics often has some as well. I lined the body in a flannel that's no longer in stock from Raspberry Creek Fabrics but they have lots of good options here, and the sleeves in rayon bemburg from Joann. 
3. Water resistant zipper jacket zipper. I got this one from Wawak.
4. Seam Tape. This gets ironed on over all the interior seams so that no water gets through the holes created from the stitching. It can be hard to find a good, reliable one. I did a lot of research and ended up ordering this one. I ordered two rolls because I didn't know how much I would need and didn't want to run out mid project, especially considering it ships from Korea or something like that. I ended up needing both but I have most of the second roll left. Its nice to have on hand for repairs if I ever needed to.
5. Interfacing. SF101 is my go to woven interfacing, I get it from Joann and use a coupon. 
6. Spring snaps. I bought these from Amazon, but places like Closet Case Patterns sell a hardware kit in which the snaps are included. I didn't get the hardware kit because I omitted the drawstring and opted for a water proof zipper so I didn't need anything but the snaps, so I preferred to source them myself in a finish I wanted (I used gunmetal).

Extras - for my version I did a lot of zippered welt pockets so I used two 9 inch zippers for the outer pockets, two 7 inch zippers for interior pockets in the lining, and one 5 inch zipper on the sleeve for my ski pass. Also, 2 magnetic snaps for my pocket flaps. (Which I regret, wish I would have used something else. More on that later.)

(I don't know why I look pregnant here....I'm not haha)

Sizing/Adjustments 
Since this is a coat that will have layers underneath, I sized up everywhere except the waist. I did not do the drawstring but did want a little bit of shaping, and there is a lot of ease at the waist so I did my actual size for that. I think my coat ended up being a 16/14/18. I did a broad back adjustment to mine as that's a regular adjustment for me and I shortened it 3/4 of an inch, which was personal preference after making my first waxed canvas one. I also wish that I had lengthened the sleeves an inch. It wouldn't be necessary for a regular coat but for skiing and keeping snow out, I wish they were a tad longer.


Design Features
Although this is for skiing, I did not add any insulation. My old coat was just a shell with a removable insulated vest but I never wore the vest, just the shell. I like it like that. Then I can add whatever layers I like underneath and adjust as necessary. Although cold in the mountains, you often warm up a lot and with insulation in the coat you have less options. So I just lined it in a flannel. You could, I suppose, not line it all as the patten originally comes, but I didn't want to see all the seam tape in there. 

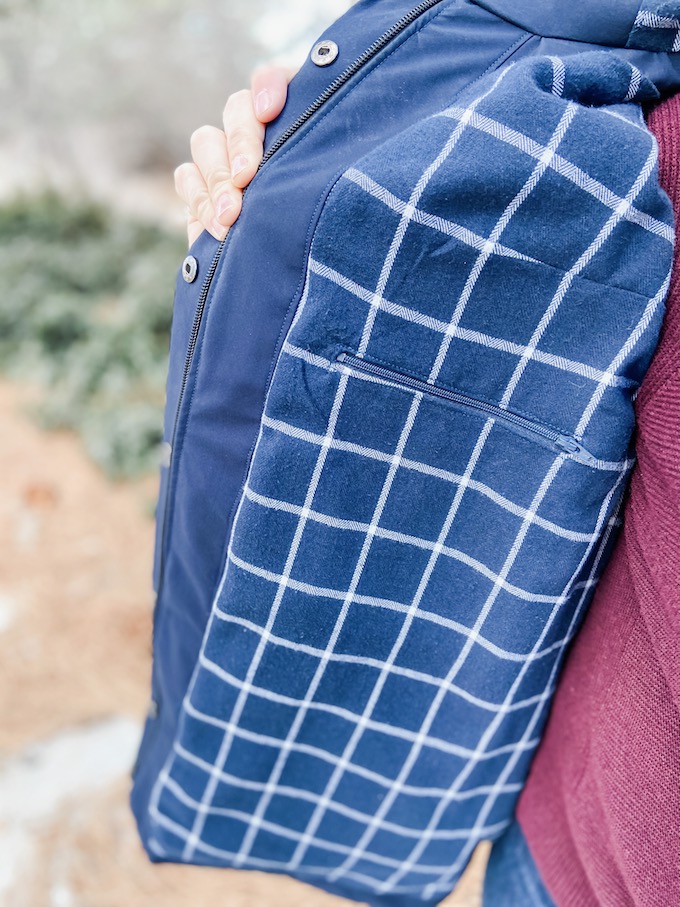
I like to have lots of 'storage' so I added interior zippered welt pockets to the lining. I like to stash my phone and keys somewhere safe, and its nice to have room for snacks, too (we're teaching our 5 and 3 year old this year). I also did not do the gusseted pockets that come with the pattern and did zippered welt pockets for those instead. Its a common pocket type found on ski gear. It leaves a cleaner silhouette and keeps everything safe and secure.  I then added flaps to the pockets to cover the zipper to keep the water and snow out, and magnetic snaps to keep them secure. I used regular magnetic snaps like you would use for bags and that's my only regret. I wish I used these sew in magnets that could or could not be visible depending on you chose to install them, and would just close on its own when the flap is down, instead of the actual full on magnet snapping in place. 

Lastly, in terms of pockets, I added one on my outer left forearm for my ski pass. My local resort has RFID chips that scan you as you go through the lift, so as long as its on you person, it reads. But I like having its own dedicated spot so it doesn't get mixed in with other things in my pockets and get lost. For some reason, when I sewed the pocket on to sleeve I put them zipper on the bottom, instead of the top. But really it doesn't make a difference. I never take it out. It just stays in there all season.


Applying Seam Tape
For the most part, applying seam tape was easy, but the curved seams were a bit tricky. After I sewed a seam, (or a few) I took it over to the ironing board, measured out a strip of the tape (which is not sticky at all, only once heat is applied) and used a press cloth to iron it directly over the seam. I applied the tape to every seam, even sleeve and hood seams. Those were the hard ones because of all the curves. Just go slow, be patient and use a tailors ham or sleeve roll to help.

Also - don't pull the tape tight as you iron it! It shrinks and pulls as it adheres to the fabric, therefore pulling the fabric in as it contracts. You can see it pulling on some seams in my coat. so make sure its really loose as you apply it.

Zippered Welt Pockets
If you've sewn a bag, (or any other pattern, like the Brunswick Pullover from Hey June that has one on the sleeve)  chances are you've sewn a zippered welt pocket and can follow the instructions from that pattern, just applying it to this one. If you have never done one before, here's a quick over view. Don't be scared it's actually easier than a traditional welt pocket because you don't have to form the lip part of the pocket. These are easy and once you get the hang of it, you can add them to anything you want. 

1. Mark a line on your fabric where you want your zippered pocket to be. Make it the same length as your zipper. On the back of your fabric where the zipper will go, adhere a strip of interfacing.

2. Figure out how deep and wide you want your pocket to be. Cut a rectangle as a wide as you want your pocket + seam allowance and twice and deep as you want your pocket. It will be folded in half vertically to create your pocket. (My pocket here is not a regular rectangle because these were for the main pockets on the front and I wanted the opening to be the same angle as the original pockets from the pattern. But my pockets in the lining are just regular rectangles with the zipper at the top).
3. Near the top of you pocket bag (rectangle you just cut), but leaving enough room for all edges to be sewn, draw the same length of line as you did for step one and match up the lines, putting the pocket piece right sides together over your main fabric.
4. Draw a box around the line where your zipper will be. The box will be your stitch line and inside the box will be open, and the zipper will be put inside it. Stitch on the lines of the box making it as precise as possible.


5. Cut down the middle of the inside of the box you just stitched. Stop a half inch from each end, and then snip in at an angle towards the corners without cutting through your stitching. 

6. Pull your pocket through the hole, to the back (inside) of the garment. Press the opening well to create a crisp clean box opening. 

7. Turn the garment to the front, and place the zipper centered inside the opening and pin place. From the right side, sew neatly around the zipper on your main fabric.

8. Turn your garment to the back, and fold up the bottom of the pocket bag to meet with the raw edge on top. Sew around all three sides. 

Viola!

You made a zippered welt pocket!

-----

Adding a flap to a pocket
I added a flap over my external zippered pockets to protect them from snow and water as I didn't use water resistant zippers here, and because I thought it looked good and professional:)

1. Create your flap piece. I used the Kelly Anorak flap piece as a guide to make mine. To cover my zipper, I needed to make it bigger so I just sort of eye balled it and drew one, making sure the size after seam allowance was big enough.

2. Cut out four pocket flaps. If you are adding a snap or magnet to secure these pockets, install them before you sew the flap pieces right sides together on all sides except the top.
3. Trim seam allowance and corners, and turn right side out.
4. Turn top raw edges to the inside and sew closed. Alternatively you could just serge the edge or baste it closed. 

5. Place the flap above the zipper in your desired position, pin, and sew in place. Then fold the pocket down, covering the zipper, and top stitch the pocket flap down along the top seam.
Cost Breakdown 

Pattern: $16 -I had already bought and sewn this pattern before so I don't really count the cost of it... but I will add it
Lining Expansion: $8 (again, had already purchased and used)
Large Format printing at PDF Plotting: $13.95 ($6.95 + $7 shipping)
 I had already printed it before when I made it the first time, and it was included with a bunch of other patterns I was printing at the time to make shipping worth it, but I'll price it out as if I was just printing this pattern +shipping
Gortex fabric: $56.97
Lining Fabric: flannel: $16 (rayon bemburg from my scrap bin)
Seam Tape: $40.95 ($17 a roll, bought two rolls, plus $6.95 shipping)
Water proof zipper: $6.90
Other zippers: $1.45 (.29 each on Wawak)
Interfacing: $3:49 (for it 50% off, usually $6.99/yard
Snaps: $10.99
TOTAL: $158.70

Not cheap maybe, but pretty amazing for a custom fit, fully seam taped, ski coat!
If you are easy to fit, you might be able to find a great quality ski coat for cheaper than this. For example, we live by a Patagonia outlet, and my husband scored an amazing coat for cheaper than this. But they just don't fit me. If they did, I would have bought one. You don't have to make everything just because you can, unless you want to:)


Sunday, November 24

Waxed Canvas Closet Case Patterns Kelly Anorak

I jumped into making outerwear a few years ago and have now made lots, but somehow I've ended up with very light weight Spring jackets and very heavy wool coats and not a really functional, mid weight, all weather type jacket which is what I actually need most of the time. So this Fall, I decided to finally get to it!

I decided on on the Kelly Anorak because its been made a thousand times, has great reviews, a lot of resources, and it seems like the right silhouette for this all purpose coat. When thinking about fabric I decided to go with a waxed canvas because that would be able to withstand some rain and protect more against wind. But most waxed canvas I found was quite heavy, stiff, and very waxed. Meaning you could see every line and crease and the fabric appeared and felt kind of wet or oily. I think these fabrics are awesome in bag making, but I didn't want it for my coat.

Then I came across this fabric from Blackbird Fabrics. Its 7 oz, so not too light, not too heavy, and its a dry waxed canvas. So you can't feel or see it in the fabric at all but when you splash water on it the water still rolls right off. And I love it! I wasn't completely sold on the color, but it does match everything so it will be really functional.

I decided to buy the lining expansion for this pattern for a little more warmth and a more complete, finished look to the garment. For lining fabric I went with this flannel I used on my cascade duffel coat because I had a yard left and a flannel would be cozy inside. I barely, and I do mean barely, had enough to line the body of this with my left over fabric. I used a slippery lining left over from two other coat projects for the sleeves and hood.

The Struggles 

Guys, I will admit, while happy with my fabric choices, this waxed canvas was a pain to sew with. It's not supposed to be pressed because it affects the wax in the fabric, but a finger press really isn't enough to hold the seams or to look good. So I still used heat and steam, but used a press cloth. I tested by pressing a scrap of fabric and then splashing it with water to see if it was still water resistant and all was well.

But that wasn't the only issue. Next was that fusible interfacing really doesn't adhere well at all. I read this blog post on a waxed canvas Kelly and she used fusible so I attempted it because I really didn't want to use sew in because...#lazy. None of the three I tried were that great. But I went with one anyway. I decided if it came off, it was practically like sew in interfacing anyway because everywhere there was interfacing, it would be sewn into a seam. And because of this fabric, the jacket can't be washed whether in a machine or dry cleaned, so I figured the washing process couldn't really mess up the interfacing so...I went with it. Only time will tell if I made an enormous mistake!
But problems still don't end there! You really shouldn't unpick on this fabric because all holes pierced in it stay, even if you try to iron them out. For example, I tried on my jacket and held the drawstring casing at my natural waist, pinned a few places (again - holes stay so use pins sparingly, too) then basted the drawstring on. It was great in the front but too high in the back. Like way too high, so I had to unpick it, and re-sew it in the correct place. That whole line of stitching in the back is still visible. I don't mind so much because I can't see it when I'm wearing it and because I don't think others will be looking so they won't notice either. But it's there. Also it effects the water resistance of this jacket but since I don't mean for it to be a full on rain coat, I am ok with that.

Construction

Other than issues caused by fabric choice, I found construction to go ok. There were 2 parts that were frustrating. First was attaching the hood lining to the jacket. That was really confusing so I looked up the sew-a-long and that sort of helped and eventually I figured it out and got it in. The second thing was the worst. The instructions have you baste the drawstring casing on to the outside. Then once the lining is in, to topstitch in into place, which means sewing over the lining. I did not enjoy that! It was super hard to not get any tucks or puckers in the lining fabric. I unpicked a few times, and eventually left well enough alone, though its definitely still not perfect. I would have preferred just sewing it on all the way at first, and not sewn it to the lining.  (Also in the photo below, that first line of stitching on the zipper facing shouldn't be there. Its from top-stitching the outer band and I should have done it an earlier step but didn't I guess...)

There is a third thing that I found that difficult, but it wasn't the pattern's fault. The sleeves were super duper hard to set in because of this fabric. It's a very dense weave, and while not heavy, it is very structured and has no give at all. So after doing the basting stitches to slightly gather and ease the sleeve in, they were super puckery. I fixed them mostly, and what's left I should have been able to fix with a good steam and press on any other fabric. But not on this, because like I said earlier, it doesn't press well and you shouldn't use much heat.

The rest of the instructions were clear and easy to follow. Even the gusseted pockets were a breeze and I expected those to be harder. I did have a lot of issues inserting my snaps, though, which I did not expect because I've done snaps a lot before. I used heavy duty snaps instead of the spring snaps the pattern calls for, simply because I've used them before and I have the pliers for them so I wouldn't have to do a bunch of hammering. Despite my pliers and previous experience with snaps - they were a nightmare! But my husband and I realized what happened - this time I ordered these snaps from Wawak to get the antique bronze color, instead of buying them from JoAnn like I usually do. Turns out the length of the shank of the snaps from wawak is longer than the Dritz ones from JoAnn, and in most places, the fabric it had to go through wasn't that thick, so the snaps couldn't get pressed down enough by the pliers for the two sides of snaps to click together. We worked it out though, or at least my husband did! He ground down the extra length on the snaps so they went together correctly. They gave us quite a bit of grief but at least they all work now!

Sizing

In terms of the jacket fit and style: I sized up a size, everywhere, almost two sizes in the bust because I was in-between a 12 and 14 and was going to go with a 14 when I decided to size up to a 16 to have room for warm layers underneath.  The Kelly Anorak is meant to be an unlined jacket, for barely cool weather, without layers worn underneath. So I wanted to make sure I'd have room. That said, I have plenty of room. I'm not sure I needed to size up. Also, I was told by several that the sleeves are quite slim, but by sizing up I made my sleeves really big. I think I maybe could have been fine without sizing up, but with that said, I can wear big hoodies and sweaters under this and it is nice. When worn without layers underneath it is a bit big, but I guess that's fine. Also, probably because I sized up, the hood is huge. Like laughably enormous. When I put it up it falls completely in my face unless I style it in the right spot, like for these photos:)

Up Next 

Overall I am really pleased with it. The temperatures have just recently dropped a lot here over the last week and I've enjoyed wearing it. And now I've got another version in the works. It's a Gortex, seam taped, fully waterproof ski coat version. I am leaving off the drawstring and gusseted pockets for a cleaner silhouette and doing zippered welt pockets with a flap over them so I don't lose anything while going down a mountain. I'm also adding zippered welt breast pockets in the lining and a small flat pocket to the outer forearm for my ski pass. For sizing of this one I'm doing the same size mostly but going down one a half sizes at the waist for some shaping since I left off the drawstring. Also, although the hood is huge on my waxed canvas one, its perfect on this because it fits over my helmet when skiing!  With so many mods, I'll definitely blog it, too, as soon as its done which should be in less than a week hopefully!

Monday, October 28

Sewing Outerwear - Cascade Duffle Coat


A few years ago I saw people sewing outerwear and was sure I would never do that. It seemed rather daunting and very overwhelming. I felt like I wouldn't have the skills and that it would be too expensive of a project for it to turn out badly. Then somehow,  my friend Rachel convinced me to host the #coatmakingparty with her on Instagram. I made two coats that month. First was the Lola Coat, which is oversized and has no closures and seemed like the easiest coat I could make. It also doesn't have a lining but on my own, I managed to create lining pieces and figured out, with some trial and error, how to bag it. Then I made the Clare Coat, which was the easiest possible wool coat. Raglan sleeves and an a-line shape meant easy sleeve insertion and minimal fitting to deal with. I found both projects very easy and quite straightforward. So then I made a couple Joy Jackets and really started to love sewing jackets and coats. Now, two years later its possible I have an obsession with making outerwear. And its absolutely true I have an obsession with this Grainline Studio Cascade Duffle Coat.

There are a few things you can do to make sewing outerwear very approachable and possible for all skill levels. And I'm sharing all my tips with you!


Tip 1: For me, coat making is best if broken down into a series of very manageable steps. These are the steps I took, and there were some days off in-between some of the days. I find having just a bit to do each day made this project feel quite easy. Almost everything is just a series of straight seams, which anyone can do. And having just a little to do also means you can sew a coat even if you don't have tons of time to sew each day. Whether you work full time or have an entourage of littles like me, you can do this! Also, you can break down your steps into whatever works for you, and apply this to any coat pattern, not just this one. This is just how much I got through at nap time every day.

Day 1: Order copy shop or print pattern.
-I recommend ordering a copy shop print because this pattern in particular, is huge. If you bought the paper pattern, then you can obviously skip this.

Day 2: Cut out/trace pattern.
-I always cut out patterns because #lazy

Day 3: Do any flat pattern adjustments you need and cut out lining.
-I did a broad back adjustment. I've sewn lots of Grainline Studio patterns so I knew I needed this. And I like to cut out and sew the lining first because I can make any fit alterations on cheaper fabric than the wool.

Day 4: Sew lining together and do any necessary adjustments
-I let out the seam allowance of the sleeves for more room

Day 5: Cut out the rest of the pieces (main, lining, interfacing). There are a lot of pieces...

Day 6: Fuse all interfacing, start outer assembly (Front pieces, back pieces, pockets)

Day 7: Assemble zipper and center front bands

Day 8: Shoulders, side seams, sleeves. Do any fitting needed on outer.
-I knew I would need shaping because of my swayback so I cut my main back piece in two pieces instead of on the fold. Then I could take it in in the center. I took it in until it fit well, then trimmed the seam allowances back to 1/2 inch. I did this instead of adding fish eye darts later, like I did on my Clare Coat. They were bulky and I didn't love them so I figured I wouldn't mind the look of an added center back seam if the shaping looked better.


Day 9: Hood (Or collar if yours doesn't have a hood)

Day 10: Sleeve and hem facings

Day 11: Bag the lining! Press coat and hand stitch bottom pleats and sleeve lining opening.


Tip 2: Use wonder clips! Pins just don't work when working with such bulky seams. Especially when you start to bag the lining, the center front seams can be super thick and the clips are pretty essential.

Tip 3: Use a jeans needle or a stretch needle. The jeans needle helped me, but if you still have issues or  skipped stitches, you can use a stretch needle as the eye is higher and will help with the bulky seams.

Tip 4: Use a walking Foot I found this pretty essential. A walking foot can be big and hard to work around with such thick fabric like wool, but you really need one to keep all your fabric properly aligned. You may need to switch it out for different parts of the construction (like for the zipper, etc) but on the whole its super useful. (I used a zipper foot for my toggles because I had a very narrow areas on which to sew, so switch feet as needed. But I definitely needed my walking food most of the time.)

Some questions I've received about coat making are:

What interfacing should I use and how do I source the good stuff?
- I'm really glad I made the Clare Coat before this because that pattern and sew a long talk about interfacing whereas this pattern did not specify. So I learned while making the Clare that wool coats should use fusible weft interfacing. My JoAnn in Utah had it in the store, it feels kind of fuzzy on one side with the glue on the other side. My JoAnn here does not carry it but I found it on  Wawak here, and this is what I used. 

Is making a coat worth it? 
this is harder to answer because criteria for "worth it" will vary person to person. Are you trying to save money and comparing the cost of making one to the cost of buying one from the store? Are you trying to be more ethical and sustainable? Are you trying to find one that fits perfectly?

For me - the answer is whole heartedly yes! But that is because I am looking for something that fits well, and if it costs me more time and money to get that, its still worth it to me. But if you're on there financial end of things, I'll  share how much this project cost.

Wool: $60 (black Friday sale from Mood) I have a yard left over too...maybe I can use it for my daughter!
Flannel lining: $20
Slippery sleeve lining: remnant from an old project
Interfacing: $20 but I have lots extra, it comes in 5 yard rolls
Toggles: $13.06
Zipper: $3
Pattern: $16 (black Friday sale)
PDF Plotting for printed copy shop file: $10
I'm not pricing out thread because I had what I needed for other projects and didn't have to go get any special for this.
TOTAL: $142.06

While not inexpensive, considering its 100% wool with warm flannel lining, graded between three sizes, with shaping added to the back and a broad back adjustment all for a perfect fit, I'd say that's a good deal. BUT! There is also time factored in and if its not worth it to make your own, if you're easier to fit, and can find what you're looking for elsewhere - nothing wrong with that! I bought a beautiful, more formal, long fitted wool coat with all princess seams two years ago and have zero regrets about it. It's amazing. You don't have to make everything!